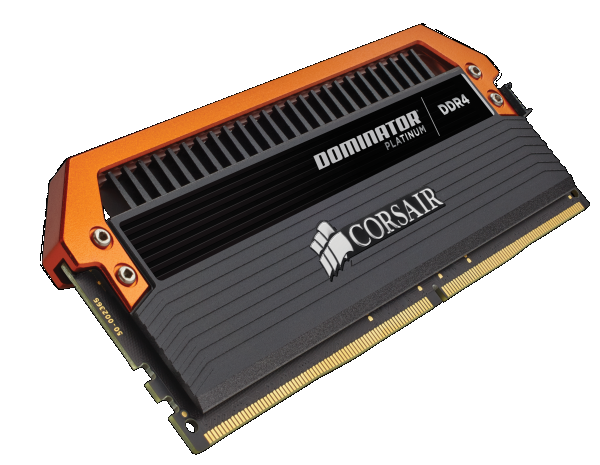
CORSAIR Dominator Platinum Limited Edition Revisited
CORSAIR DOMINATOR PLATINUM DDR4 3400 Revisited
The following is a re-visit to the Dominator set of memory we reviewed in issue 34 of TheOverclocker magazine. The reason for this is that I recently had to explain to an individual why I would award such an expensive memory kit the editor’s choice award.
Their position was that, given what I showed in the results, nothing in the memory suggested or warranted such high praise. In fact, they went on to state that as a publication. We had done no better than the many websites which review high performance kits via pedestrian level tests. Tests which neither inform nor enlighten the reader as to what it is the memory is capable of.
Naturally, this was of concern to me, but it did echo true because upon examining that review, one has to admit that the content was rather passable, perhaps even vacuous for the target audience. In the four pages, the only thing I had brought forth was the fascination with the high frequency and a working X.M.P profile. Sure enough, there were some scaling results that showed how tight the memory could be configured via the primary settings, but truth be told – that was to expected since these are high binned Hynix ICs and once again, it is a $875 set of memory.
In light of this, I decided to re-examine the memory and bring forth the results and notes I had initially gathered, prior to the review being filtered and pacified. There is no need to go back to the ordinary or aesthetic aspects of the kit. You may – at any point – read the initial review and gather my thoughts in regard to those aspects. This is strictly what happens with the memory when you tune it down as far as it will go, outside of the primary timings. Indeed, there is re-evaluation of what happens with CAS latency. Focus primarily however, on what the memory reveals as the ideal performance setting. I used voltage from 1.35 to 1.45V. This is safe and there should be no degradation at up to 1.45V or slightly above. Obviously if you’re looking to tune for 24/7 settings, you’ll want to stick to 1.35V. An additional 100mV however is unlikely to cause harm to your memory.
Test Configuration
- INTEL Core i7 5960X @ 4,000MHz (Uncore @ 4,000MHz)
- GIGABYTE X99 SOC-Champion (F4i/F4j)
- EVGA GTX 780Ti Classified K|NGP|N Edition
- Samsung XP 941 512GiB M.2
- CORSAIR AX1500i PSU
- Windows 7 64-Bit
- NVIDIA ForceWare 353.12
For the individual who straddles the line between a high level competitive overclocking and an enthusiast, this is of importance because it highlights what most reviews, including the one we did in issue 34, do not illustrate. There is a lot more than just the CAS latency to memory. In fact, the key performance settings of some kits may even be in the secondary and tertiary timings. As often the case, tuning of these settings takes an immense amount of time and when dealing with a $875 kit. You should always take care and label the memory as stated in the initial review. Find out which stick order works best and make sure to document it all. Some combinations will allow higher frequency while others better timings. It is worth the effort as it will make a sizable difference to the level of performance you should expect. You will see in the results that there is more to gain with just tuning the secondary and tertiary timings (in the very odd way this motherboard allows) than you could possibly find solely with the primary settings. This is especially true when you’re looking at sticking to the regular operating voltage or when you have ICs that just do not lend themselves well to your particular motherboard and CPU. These are the things which make the largest difference and awareness of these facets will prove most useful.
Again, tuning memory is a lengthy process. It may take anywhere from tens of hours to days on end. Even with a single stick of memory tested in each DIMM slot, it will take a while. Consider that for each setting (within reason), one has to test for stability with Hyper Pi 32M at the very least. Days on end can be spent on a single stick even when you’re well aware of what ICs are used for the memory. When cooled most memory will scale father and that holds true for this kit as well. What follows however is achieved via regular air cooling and certainly numbers most systems are capable of achieving, especially where SuperPi 32M is concerned. It only dawned on me far after having done days of testing that the windows 7 operating system used was much slower than the Windows 8.1 operating system that I would normally use. Yes, Super Pi 32M is best run on Windows XP/2000, but this exercise isn’t an attempt at showing the 7minute 18seconds that experts can achieve with a 4GHz CPU clock. It’s to show that primary timings alone are not enough to extract the best out of your memory and there are some serious gains to be had by spending the time in tuning it all the other settings. (click the images to see larger versions)
Overclocking and Performance
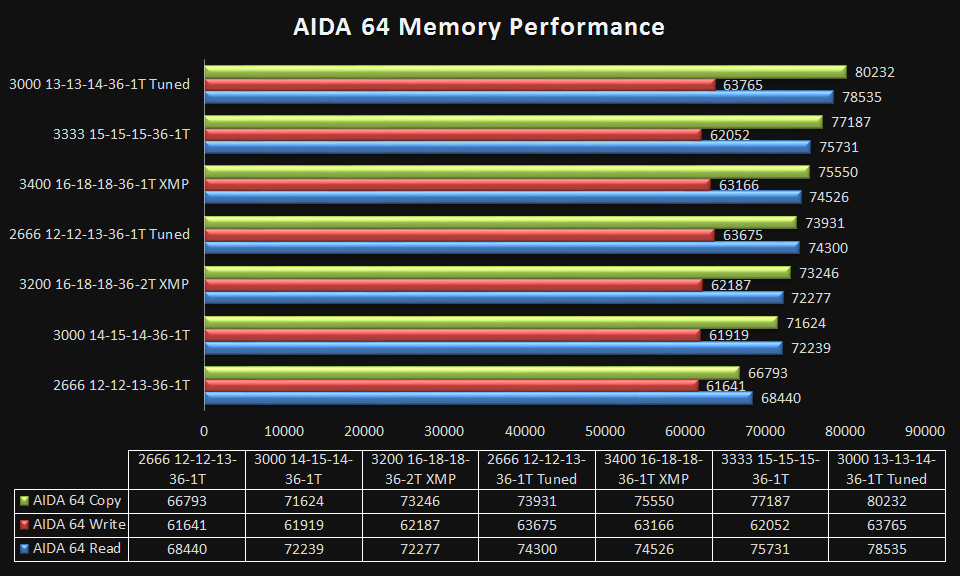
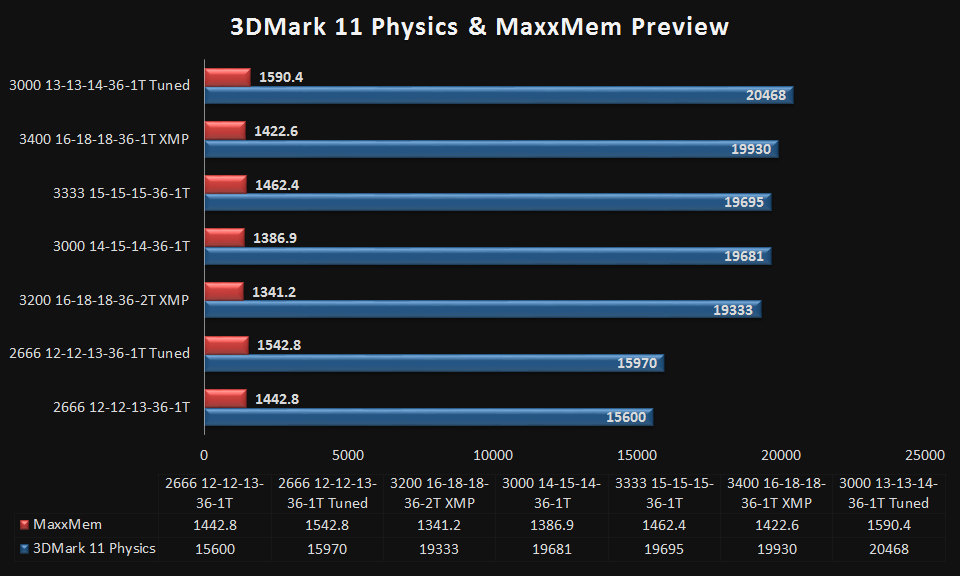
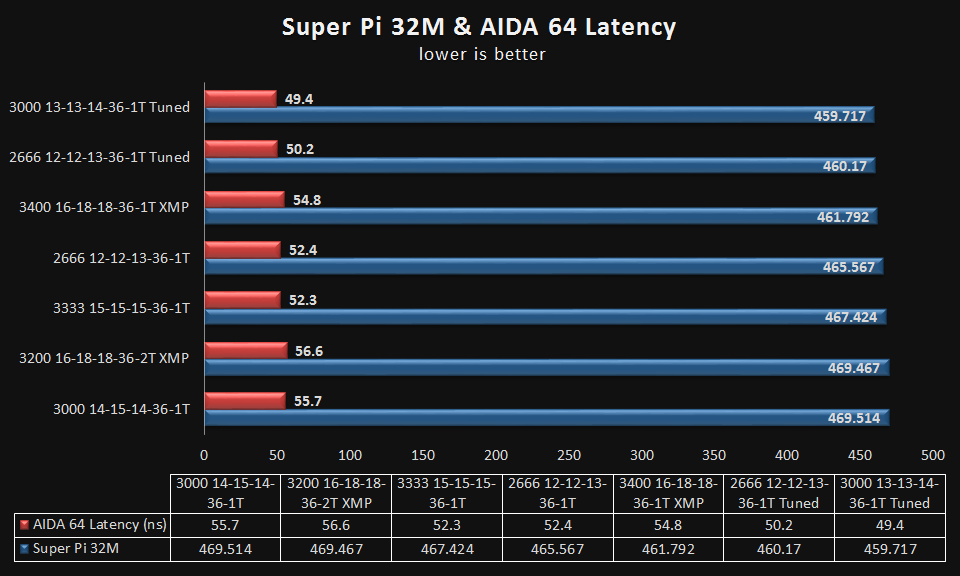
The results speak for themselves. You can clearly see what happens when you tune the memory right down as far as possible. 2,666MHz tuned will match what you can achieve at 3,400MHz in MaxxMem Preview if you rely solely on the X.M.P settings. That is incredible because it is not something you’d expect as there’s a massive frequency difference between them. Loading an X.M.P profile gets you to a safe place to start tuning from. However, that is far from where the optimum performance for the kit is to be found. In fact, a great place to start would be the “AUTO” settings at 2,666 or perhaps even 2,400MHz. Record the secondary and tertiary timings of the kit at the low speed. Then compare them with the timings you have when you’ve set X.M.P. You may then begin matching the lower values. Should you succeed, you will notice a sizable boost in performance and it will often not require any additional voltage. Sometimes sacrificing the primary timings is worth it because what you stand to gain is significantly more meaningful. Adherence to the dogma, which states the lowest CAS Latency trumps all is to miss the point entirely. do note as well that at times, you may be able to tune other settings right down to the lowest setting possible, but performance may suffer.
The experts will tell, you that tuning memory RTL and IOL is important. This cannot be overstated. It matters on every motherboard and it is where you should look to capitalize before all other settings. If you are able to keep these settings low, then you will gain some meaningful performance. Note that this is very board dependent and some motherboards will allow this adjustment far better than others will. Regardless of what you have however, you should make the most of what is at your disposal. It is a timely exercise but one that is rewarding in many ways and certainly worth spending time on. With this kit, a tuned 3,000MHz was the winning frequency, striking the right balance between operating voltage, timings and performance. Should you need the exact timings used they are available upon request as well.
So there you have it, this is what the memory can do and that is why it was worthy of the praise it initially received. It is a verdict I stand by today as well. It is that transparency in performance and detailed sharing of data, which may have put our judgement in question. The results should illustrate to you the kind of performance and flexibility that this kit allows, ultimately making it the fastest DDR4 set of memory I’ve tested to date. The ideal performance is at 3,000MHz but I’m more than okay with that if only because it does not throw out my CPU and Uncore frequencies and it still delivers superb performance. We may take a look at this kit again on the Z170 platform, but until then this is the best DDR4 kit on the block.